
Security Onion + Proxmox Testing: Endpoint Reporting
Intro
This is the third post in a series describing how to set up Security Onion to monitor your homelab (check out the first post on setting it up and a second post on testing).
We're focusing on setting up firewall rules for our vlan, and endpoint agents on our hosts within our network. This is so we can generate data and alerts, not only from the sniffed traffic, but also from the hosts itself (think log analysis, file monitoring, config assesment, etc).
Updates
I've upgraded to Security Onion to 2.3.10, apparently the version I had installed (2.3.2) had a timezone bug, and alerts were taking hours to show up. Another issue, in my journey to set this all up, was that most of the resources online (outside from the docs) were obsolete becuase they were referencing older versions of Security Onion. Apparently a lot has changed. Components have been dockerized. Configurations are applied using SaltStack. So I hope this this guide is useful to people who are trying to get started with Security Onion in Late 2020.
pfSense Firewall & VLANS
Part of this project, for me, was to set up a threat lab on a vlan. This is optional for this guide, but if you're looking to add VLANs to the mix the following instructions may be useful.
For reference, we have three interfaces: WAN, LAN, and the Threat Lab VLAN (TL). Within LAN is my home network, most of the proxmox infrastructure, and my own personal workstation where I will be accessing the Security Onion web gui exist on LAN, which is assigned to the 10.11.1.0/24 subnet. While Security Onion and any other VMs we spin up for the threat lab will be on the TL VLAN, which is on the 192.168.1.0/24 subnet and tagged under vlan 10.
Our firewall rules are dependent on how much we expose to and from the TL vlan. There will be instances in which we will want TL to have access to the internet. E.g.: You'll want Security Onion to run its updates, or you'll want other VMs on the TL vlan to be able to install packages from a package manager as you set up the VM up. Consider the following use cases:
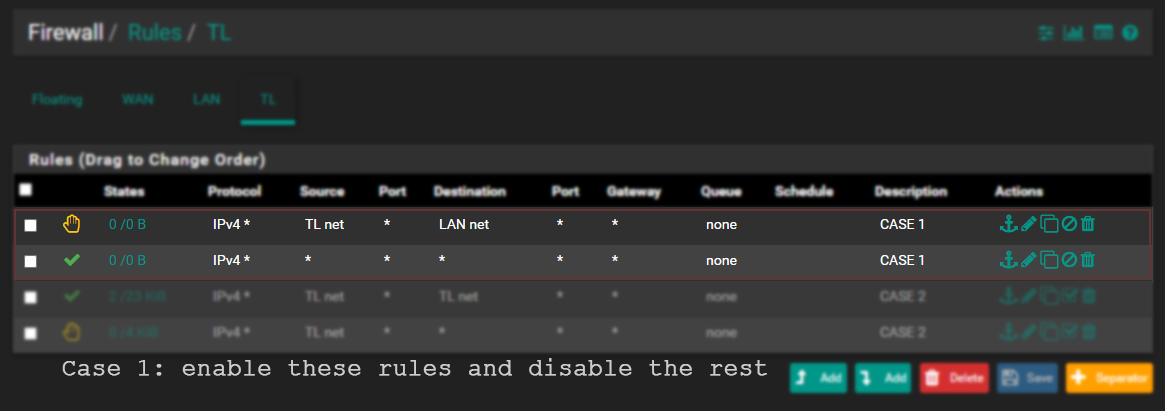
Case 1:
TLhas access to the internet.TLcannot access hosts inLAN.TLcan access other hosts inTL.
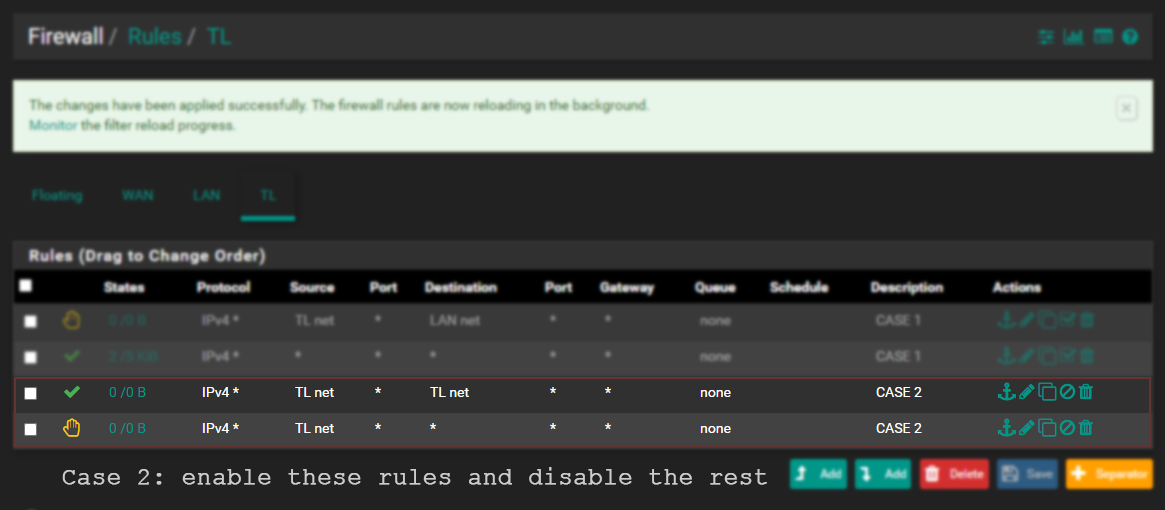
Case 2:
TLhas no internet access.TLcannot access hosts inLAN.TLcan access other hosts inTL.
My LAN rules are such that any LAN host is allowed inbound to TL. This will allow me to ssh into Security Onion, or for the endpoints on LAN to communicate as Wazuh, Fleet/Osquery agents to Security Onion. You can certainly apply more limiting rules on LAN, but I'm not going to worry about that right now.
Deploying Endpoint Agent
You're going to want to run so-allow on Security Onion to allow endpoints to communicate. This was configured during the installation, but I found I had to add my networks manually anyway:
[root@onion ~]# so-allow
This program allows you to add a firewall rule to allow connections from a new IP address.

Choose the role for the IP or Range you would like to add

[a] - Analyst - ports 80/tcp and 443/tcp
[b] - Logstash Beat - port 5044/tcp
[e] - Elasticsearch REST API - port 9200/tcp
[f] - Strelka frontend - port 57314/tcp
[o] - Osquery endpoint - port 8090/tcp
[s] - Syslog device - 514/tcp/udp
[w] - Wazuh agent - port 1514/tcp/udp
[p] - Wazuh API - port 55000/tcp
[r] - Wazuh registration service - 1515/tcp

Please enter your selection:
Osquery
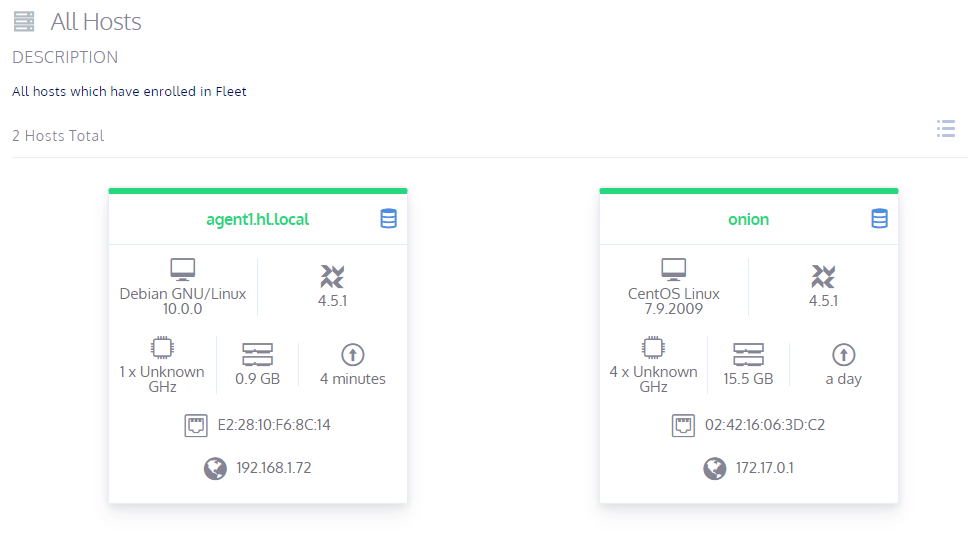
Osquery allows you to query your endpoints like they're object in a database. Security Onion uses Kolid Fleet to manage osquery and provide info about your endpoints. If you open up Fleet in Security Onion, you'll see the machine for Security Onion itself. There you can see info about your endpoints and send SQL queries to all that information.
Installing the agent
Download the osquery from within Security Onion web gui. Navigate to something like: https://<security onion host>/#/downloads. The package will come preconfigured to connect properly. I simply downloaded it to my workstation and used scp to upload it to a new VM I spun up running Debian 10.
E.g.: scp deb-launcher.deb bilk0h@192.168.1.72:/home/bilk0h
Then on the endpoint itself: sudo dpkg -i deb-launcher.deb
Now when you open up Fleet you should see your endpoint registered (don't forget to use so-allow to allow access to osquery endpoint):
Check out https://docs.securityonion.net/en/2.3/osquery.html if you need to troubleshoot.
Wazuh
Wazuh acts as our Host-based Intrusion Detection System (HIDS), and will provide us more data and alerts based, not on sniffed traffic, but on system data like logs and file hashes sent from our endpoints.
Installing the agent
Here are the instructions on how to install the Wazuh agent on a diverse set on environment: https://documentation.wazuh.com/3.9/installation-guide/installing-wazuh-agent/index.html. But I'll briefly gloss over how I installed it on debian 10.
apt-get install curl apt-transport-https lsb-release gnupg2
curl -s https://packages.wazuh.com/key/GPG-KEY-WAZUH | apt-key add -
echo "deb https://packages.wazuh.com/3.x/apt/ stable main" | tee /etc/apt/sources.list.d/wazuh.list
apt update
One thing to note, is that the version of Wazuh agent should match the version running on Security Onion.
[root@onion ~]# sudo docker exec -it so-wazuh dpkg -l |grep wazuh
ii  wazuh-api      3.13.1-1     amd64        Wazuh API is an open source RESTf
ii  wazuh-manager  3.13.1-1     amd64        Wazuh helps you to gain security
So need to install agent version 3.13.1-1.
apt-get install wazuh-agent=3.13.1-1I had to manually register Wazuh agent manually.
On the manager (onion) add agent and extract key by running so-wazuh-agent-manage:
[root@onion ~]# so-wazuh-agent-manage


****************************************
* Wazuh v3.13.1 Agent manager.         *
* The following options are available: *
****************************************
   (A)dd an agent (A).
   (E)xtract key for an agent (E).
   (L)ist already added agents (L).
   (R)emove an agent (R).
   (Q)uit.
Choose your action: A,E,L,R or Q: a

- Adding a new agent (use '\q' to return to the main menu).
  Please provide the following:
   * A name for the new agent: agent1
   * The IP Address of the new agent: 192.168.1.72
Confirm adding it?(y/n): y
Agent added with ID 002.


****************************************
* Wazuh v3.13.1 Agent manager.         *
* The following options are available: *
****************************************
   (A)dd an agent (A).
   (E)xtract key for an agent (E).
   (L)ist already added agents (L).
   (R)emove an agent (R).
   (Q)uit.
Choose your action: A,E,L,R or Q: e

Available agents:
   ID: 001, Name: onion, IP: 192.168.1.70
   ID: 002, Name: agent1, IP: 192.168.1.72
Provide the ID of the agent to extract the key (or '\q' to quit): 2

Agent key information for '002' is:
MDAyIGFnZW50MSAxOTIuMTY4LjEuNzIgNzEzODA3NDI4Y2JhMDYxZTIxZjYxMDAyZjU1NmQ1MmU1MDIzMWQ4OTNkZmI0YjM4NWEyMDhmYWRkYjYxNWNlOA==
On agent run /var/ossec/bin/manage_agents to add key:
root@agent1 ~# /var/ossec/bin/manage_agents


****************************************
* Wazuh v3.13.1 Agent manager.         *
* The following options are available: *
****************************************
   (I)mport key from the server (I).
   (Q)uit.
Choose your action: I or Q: i

* Provide the Key generated by the server.
* The best approach is to cut and paste it.
*** OBS: Do not include spaces or new lines.

Paste it here (or '\q' to quit): MDAyIGFnZW50MSAxOTIuMTY4LjEuNzIgNzEzODA3NDI4Y2JhMDYxZTIxZjYxMDAyZjU1NmQ1MmU1MDIzMWQ4OTNkZmI0YjM4NWEyMDhmYWRkYjYxNWNlOA==

Agent information:
   ID:002
   Name:agent1
   IP Address:192.168.1.72

Confirm adding it?(y/n): y
Added.
On agent, edit /var/ossec/etc/ossec.conf and replace MANAGER_IP with onion host ip and restart:
sed -i 's/MANAGER_IP/192.168.1.70/g' /var/ossec/etc/ossec.conf
systemctl restart wazuh-agent
If you check the web gui for alerts, you shoul dsee a bunch of Center for Internet Security Benchmarks that were ran by ossec. So it looks like we're good with Wazuh.

What's next?
We're going to set up alerts using IP Reputation and suricata to alert us to activity from IPs deemed untrustworthy. Check out Part 4.
Reference:
Versions used:
Security Onion 2.3.10
Proxmox: 6.2-15/48bd51b6 (running kernel: 5.4.65-1-pve)
pfSense: 2.4.5-RELEASE-p1