Set up Security Onion to monitor your Proxmox Home Lab
Table of Contents:
Intro
This is part 1 in the series about using Security Onion to set up a SOC Workstation to monitor my homelab and setting up a new threat lab. This homelab is virtualized and in addition to supporting my home network as a whole, it will also include a threat lab I'll be adding to the mix in later sections of this series. It was tricky to set it up in proxmox, mostly because Security Onion requires access to a span port. So this is an outline on how I get it working.
Shouts
A big shout out to Black Hills Information Security / Active Measures. I was turned on to Security Onion by them. Most of the ideas I have for this threat lab is being generated from their content.
Set the Stage
We're using Open vSwitch (ovs) because it allows us to create a mirror (or span port) of our bridge. This mirror sends a copy of all network packets through an interface we plug into our Security Onion VM to be analyzed.
Proxmox didn't come with Open vSwitch so I had to install it:
apt install openvswitch-switch ethtoolifreload -a is a helpeful command to use when changing /etc/network/interfaces or altering networking settings within proxmox web ui so I suggest installing it if you dont have it:
apt install ifupdown2The Network
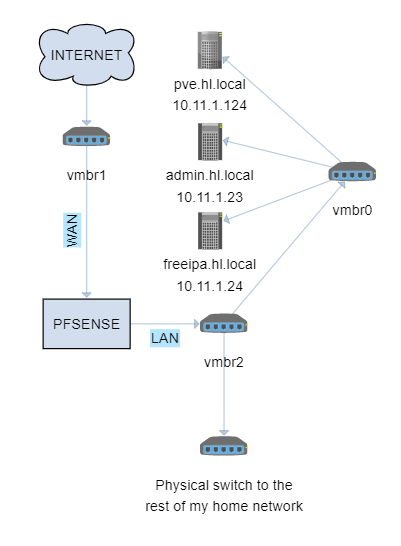
To give you an idea of what my home network looked like before adding the threat lab you can see the diagram:

This is what my /etc/network/interfaces looked like before I switched to ovs:
auto lo
iface lo inet loopback
auto enp7s0
iface enp7s0 inet manual
auto enp2s0
iface enp2s0 inet manual
auto enp3s0
iface enp3s0 inet manual

auto vmbr0
iface vmbr0 inet static
        address 10.11.1.124/24
        gateway 10.11.1.1
        bridge-ports enp7s0
        bridge-stop off

auto vmbr1
iface vmbr1 inet manual
        bridge-ports enp2s0
        bridge-stp off
        bridge-fd 0

auto vmbr2
iface vmbr2 inet manual
        bridge-ports enp3s0
        bridge-stp off
        bridge-fd 0
It took some doing but this is how the /etc/network/interfaces file is laid out to work with ovs and the threat vlan (vlan 10) where security onion and any other threat lab machines will reside:
iface lo inet loopback
auto enp7s0
iface enp7s0 inet manual
auto enp2s0
iface enp2s0 inet manual
auto enp3s0
iface enp3s0 inet manual

# VMBR0
allow-ovs vmbr0
iface vmbr0 inet static
        address 10.11.1.124
        netmask 255.255.255.0
        gateway 10.11.1.1
        ovs_type OVSBridge
        ovs_ports enp7s0 vlan10
allow-vmbr0 enp7s0
iface enp7s0 inet manual
        ovs_bridge vmbr0
        ovs_type OVSPort
allow-vmbr0 vlan10
iface vlan10 inet static
        ovs_type OVSIntPort
        ovs_bridge vmbr0
        ovs_options tag=10

# VMBR1
allow-ovs vmbr1
iface vmbr1 inet dhcp
        ovs_type OVSBridge
        ovs_ports enp2s0
allow-vmbr1 enp2s0
iface enp2s0 inet manual
        ovs_bridge vmbr1
        ovs_type OVSPort

# VMBR2
allow-ovs vmbr2
iface vmbr2 inet manual
        ovs_type OVSBridge
        ovs_ports enp3s0 vlan10
allow-vmbr2 enp3s0
iface enp3s0 inet manual
        ovs_bridge vmbr2
        ovs_type OVSPort
allow-vmbr2 vlan10
iface vlan10 inet static
        ovs_type OVSIntPort
        ovs_bridge vmbr2
        ovs_options tag=10
If there's a more elegant way to accomplish this, let me know. This is just the first thing that worked.
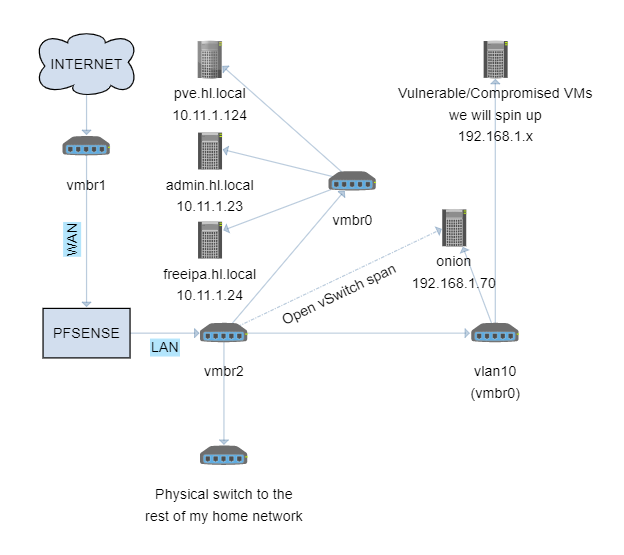
The way it's set up is that we can mirror either vmbr0, which will mirror all the traffic generated within our virtualized environment. Or we can mirro vmbr2, which will mirror all traffic that within our LAN. I like the latter because I want security onion to watch all my traffic, including all the machines and devices that are connected to my home network.
Here's what the network diagram looks like now:

The Machine
Security Onion is jam-packed with resource-hogging applications run in dockerized containers. I had to reserve quite a bit of resources. 200gb of storage. I gave it 12gb of ram and it hover around 90% utilization. You can check out the suggested requirements here: https://docs.securityonion.net/en/2.3/hardware.html I installed the EVAL version, rather than PROD because that seemed overkill.
It also requires two network interfaces a management: a management and a sniffing interface.
The management interface, which, in my case, is set to eth0 and has a static ip. This is the address from which I'll access the web interface or ssh into the machine.
The sniffing interface, eth1, can be set to manual. Really it's just an empty interface that proxmox will automatically make a tap device for. And it's that tap device we use to anchor ovs's port mirroring to.
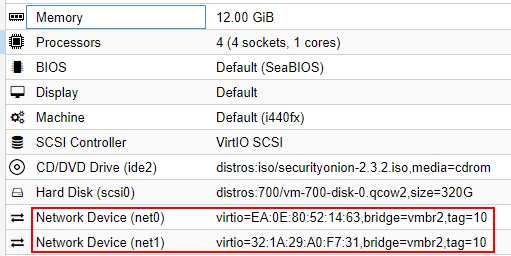
Here's the setup for the onion VM:

Take note: both network devices are tagged with our vlan (10). If you're mirroring a different bridge, say vmbr0, you would change these settings accordingly.
If you need more direction setting up and using Security Onion, there are many great resources. Check the references for a video playlist I found helpful.
The Mirror
This is the critical part. We need to use Open vSwitch set up the mirror/span port. This is the command that needs to be issued from within the proxmox terminal itself:
ovs-vsctl -- --id=@p get port tap700i1 \
    -- --id=@m create mirror name=span1 select-all=true output-port=@p \
    -- set bridge vmbr2 mirrors=@m
On line 1, --id=@p get port tap700i1 gives us the id of that tap port that proxmox creates for every network interface attached to a VM, and sets it to the @p variable. tap700i1 signifies the tap devices for the vm id of 700 (my onion vm), and the second interface 1 aka eth1.
On line 2, --id=@m create mirror name=span1 select-all=true output-port=@p we create the mirror itself, specify to select all traffic, and output it to the port we defined as @p.
Finally, line 3, attaches the mirror the vmbr2 bridge. Also, this command needs to be re-issued if proxmox restarts. Check out the post linked in references for a cron script to do just that.
Some useful commands are ovs-vsctl clear bridge vmbr2 mirrors, to remove a mirror, and ovs-vsctl list Mirror to show active mirrors.
Your output should look something like this:
root@pve:~# ovs-vsctl -- --id=@p get port tap700i1 \
>     -- --id=@m create mirror name=span1 select-all=true output-port=@p \
>     -- set bridge vmbr2 mirrors=@m
982bcd81-6185-4cfc-a5b2-cd34d4a8ac61
root@pve:~# ovs-vsctl list Mirror
_uuid               : 982bcd81-6185-4cfc-a5b2-cd34d4a8ac61
external_ids        : {}
name                : "span1"
output_port         : a1ab59be-754f-43b3-ba2e-7900e11ee343
output_vlan         : []
select_all          : true
...
In the Security Onion terminal itself, you can test by checking the output of tcpdump -vv -i eth1.
And there you have it! Security Onion has everything it needs to get started. Check the web UI and you'll see some alerts.
What's next?
In the next post, I'll go over how I test to make sure Security Onion is correctly capturing and raising alerts. Check out Part 2.
Reference
Versions used:
Security Onion 2.3.2 (I would have to update this 2.3.10 due to a timezone bug)
Proxmox: 6.2-15/48bd51b6 (running kernel: 5.4.65-1-pve)
pfSense: 2.4.5-RELEASE-p1
Open vSwitch: 2.12.0-1
Links
Examples of how to configure your network interfaces using Open vSwitch: https://docs.openvswitch.org/en/latest/faq/configuration/
Playlist for installing and using Security Onion: https://www.youtube.com/playlist?list=PLljFlTO9rB155aYBjHw2InKkSMLuhWpxH
Post about mirroring and cron file to set them up on start up: https://vext.info/2018/09/03/cheat-sheet-port-mirroring-ids-data-into-a-proxmox-vm.html#full-post